Termite Damage
Posted: February 25, 2013 in UncategorizedTags: termite damage, termite damage repair, window termitedamage
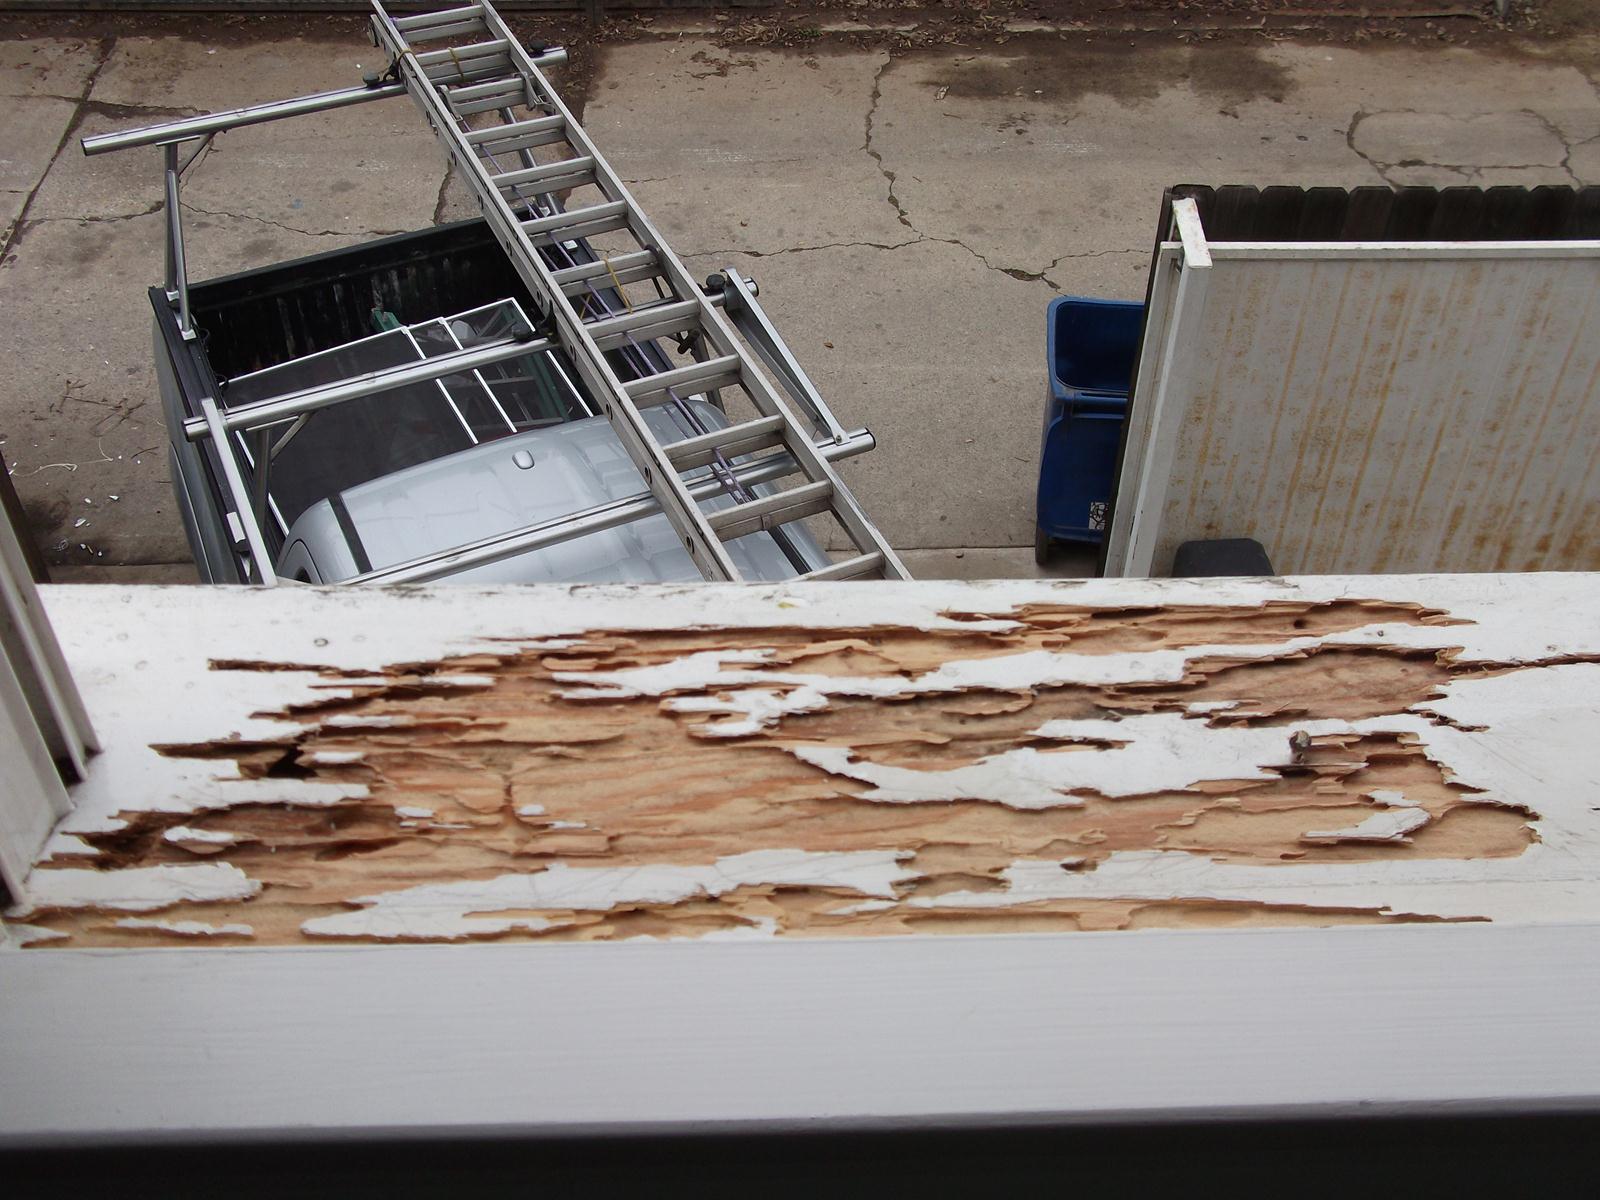
Termite damage
I’ve had a lot of experience with repairing termite damage . It has usually been a result of poorly primed and painted wood on windows, doors, fascia, eves and thresholds. Here are a few before and after pictures from termite damage on windows that I’ve repaired in the Los Angeles area.
This is one of the window sashes that I repaired prior to the repair. If you zoom in on the picture, you can get an idea of just how bad the termite damage is. They nearly ate entirely through the cross member of the frame. This next picture is how the frame looked after I was done filling the affected areas with Bondo and then sanding and priming. Please keep in mind that this isn’t even my best work. I’ve done many of these jobs where you can’t even tell it was repaired at all and this includes intricate moldings, where I’ve had to make custom sanding blocks to conform the Bondo to the existing contours.
Here is another window that I worked on in the Venice area that had pretty bad termite damage
And here is how the sill looked after I was done. You can see that it’s the same window by noticing the gate down below that was at the back of the house I was working on.

Handyman in Mar Vista
Posted: February 15, 2013 in UncategorizedTags: handyman, handyman mar vista, mar vista handyman
Handyman in Mar Vista
I’ve been a handyman in Mar Vista for almost 20 years now. I handle a wide array of jobs such as electrical, plumbing, carpentry. I’ve also done such jobs as changing springs on garage doors, repairing or replacing wall furnaces, repairing or replacing gas stove tops, replacing broken window panes, re-glazing windows, repairing and replacing termite damaged wood, roof and gutter repairs, assembling all sorts of cabinets and furniture, hanging pictures, installing shelves, installing blinds and drapery, patching and replacing drywall, painting, masonry work, replacing sash balances, replacing garbage disposers and many other jobs. Before I became a handyman in Mar Vista I worked at the Los Angeles Country Club in building maintenance and in the process of working there, I’ve repaired no less than 6 different brands of vacuum cleaners, not to mention all the other odd jobs. So I would probably say that I’m pretty well rounded in my scope of repair knowledge. While I’m based in Mar Vista, I also handle Santa Monica, Marina Del Rey, West Los Angeles, Brentwood, Bel Air, Beverly Hills, West Hollywood, Culver City, Palms, El Segundo, Manhattan Beach, Redondo Beach and most of the surrounding cities.
Weather sealing doors
Posted: January 28, 2013 in UncategorizedTags: door, weather door, Weather sealing doors
Weather sealing doors is not always straight forward. There are different makers of door shoes and weather seals for around doors and different designs as well. There are also different materials that are used for weather sealing doors, some use vinyl and others use silicone. I prefer to go with silicone for weather sealing doors because it’s a softer material and won’t crack or decay as soon as vinyl will from sun and other elements. Many times, there’s a pitch or slope to the threshold that you’re meeting with the edge of the door seal. I like to match this by cutting an angle on the end of the seal. Also, I either miter where the corner of the door seals meet or I fashion them in such a way that the seal is continuous, so as to get a better seal. There are also ways that I cut the door shoe, which is the weather seal on the bottom of the door, to get a better seal with it. You need to make sure though, that when you install a door shoe, that the threshold is higher than the floor or carpet adjacent to it, otherwise the door shoe will drag or not allow the door to open at all. If this is your situation, then you will need to either replace the threshold with a thicker one to raise the height or shim it up. The only thing is that you don’t want your threshold to slope inwards towards the door, or else you can have water leakage. Weather sealing doors is one of my specialties and my customers are always pleased with both the finished appearance as well as how well it seals the door from drafts getting through.
Converting the old style lock to the new style lock
Posted: January 28, 2013 in UncategorizedTags: replace the old style lock with the new style lock
Many older homes have panel doors that the owners want to keep, but they want to replace the old style lock with the new style lock and don’t know what to do with the mortise lock or how to fill the void left behind, once they remove it. Since almost all of these doors are painted and you’re going to end up painting the edge of the door and possible the front as well at some point, I usually remove the door, put it up on its side edge and fill the mortise with bondo. After it dries, I sand the bondo, prime and then paint the door as needed. Most of the time the door only needs touch-up paint, where the bondo was applied. Once I get to this point, I drill the holes for the new style lock and it’s pretty straight forward from here. As you may tell from my description here, the process of converting the old style lock to the new style lock is not exactly easy if you’re not familiar with using bondo or a hole saw. Also, the fumes from the bondo can be pretty strong, so it’s best to do this process outside. You may think that after reading this post, that converting the old style lock to the new style lock is more trouble than it’s worth and that you might as well replace the door. This is far from the truth. Actually, when you consider that the new door will have to have new mortising for the hinges, holes bored for the new lock so that it matches the height of the existing strike plate on the jamb, not to mention the fact that no door comes in the exact width or height of the jamb opening, unless it’s a pre-hung door… which means that you’re going to have to cut down the door width and height to match your door jamb. Then the door will most likely need painting or finishing of some sort. All this to say, it’s way more involved than converting the old style lock to the new style lock. The other thing to consider is that the older doors were made way better than the newer ones, many times with solid mahogany.
Caulking a bathtub
Posted: January 21, 2013 in UncategorizedTags: caulk a bathtub, caulking a bathtub
While preparing to caulk a bathtub there are several things to consider. If the bathtub has been previously caulked, then it’s best to remove the old caulk first before laying down the new bead of caulk. Depending on the type of caulk that was used for caulking a bathtub it may be difficult to remove. Sometimes I’ve had to resort to carefully using a chisel to remove the caulk and it was quite the laborious endeavor. Needless to say caulking a bathtub is not the difficult aspect of the job. I can lay down the new bead of caulk in about 15 to 20 minutes; it’s the removal of the old caulk and the proper preparation of the surface that takes all the time. When caulking a bathtub it probably takes me about 2 ½ hours to remove the old caulk and make sure the surface is cleaned of all loose debris and soap scum before I lay down the new bead of caulk. Since I only use silicone when caulking a bathtub I open the windows to allow the fumes to escape. These fumes generally only last about 2 hours. I usually tell my clients not to use their bathtubs for 24 hours just to ensure that the silicone has had plenty of time to set up. I see many caulk jobs that have been taken on by home owners, who have chosen to do it themselves and it looks as peanut butter smeared all over the place. This is not the type of work that I do. After I’m done caulking a bathtub it looks like a factory quality job. Caulking a bathtub and shower stall are one of my specialties. The only people that I’ve seen out in the field that do as neat of a job as myself are shower door installers that do this all day long and even some of them do a sloppy job.
Now, there are times when a house settles and the bathtub sinks a bit and a caulk joint gets too large to caulk properly. When this happens, I usually recommend that the home owner has me install quarter round tile instead of caulk for the tub surround. I’ve done many of these jobs and my clients have always been pleased with the appearance of the tub after the job is completed. Either way, I can offer you a quality solution for your bathtub or shower stall.
Hanging a heavy mirror
Posted: January 19, 2013 in UncategorizedTags: hang heavy mirror, Hanging a heavy mirror, how to hang a heavy mirror
If you are interesting in hanging a heavy mirror then it’s best to call a professional in your area. I have special brackets that I use for hanging a heavy mirror as well as heavy pictures. I’ve worked in show rooms hanging tile floor samples in excess of 100 pounds for wall displays and know exactly what’s involved in hanging a heavy mirror . My approach to hanging a heavy mirror is not something that most handymen know about. This is one of the many things that separates and distinguishes me from other handymen. I’ve hung very expensive art work among other things and have great attention to detail. When living in the Los Angeles area with its earth quakes, hanging a heavy mirror is not something you want to endeavor to do yourself unless you’ve had prior experience in this area. I’m not saying this to get your business or to discourage you from taking on this job yourself; rather I just want you to know that hanging a heavy mirror is not nearly as simple as hanging a light weight picture. Hanging a heavy mirror involves proper brackets, proper positioning, proper anchors if needed and proper weight dispersal. Over the 19 years that I’ve been in business, I’ve yet to have one of my clients call me to report one of my installations as haven fallen. If you’d like this sort of reassurance in hanging a heavy mirror then you might want to call me. I service Marina Del Rey, Culver City, Mar Vista, Palms, West Los Angeles, Brentwood, Beverly Hills, Santa Monica, Pacific Palisades and a few other areas.
Leaking faucet repair
Posted: January 19, 2013 in UncategorizedTags: Leaking faucet, Leaking faucet repair, repair leaking faucet
When it comes to a leaking faucet repair I cover most of your popular brands as well as many foreign models. I’ve worked on Delta, Price Pfister, Moen, American Standard, Chicago, Kohler, Dornbracht, Jado, Grohe, KWC, Newport Brass and a few other brands. A leaking faucet repair isn’t always as easy as simply changing the washer, since many new style faucets use ceramic disc technology. Also, when it comes to a leaking faucet repair you’ll need to know what type of washer to purchase, as different manufacturers use a proprietary washer for their valve stems. I carry a wide variety of washers on my truck to handle most common leaking faucet repair . In the event you need a new valve cartridge for your faucet, I know all the suppliers in the areas that I service and where to get the best prices. When I have completed your leaking faucet repair I will give you the receipts for the parts purchased, as apposed to plumbers that mark the parts up for a bigger profit margin. I have no desire to cheat my customer for the sake of a few extra bucks. I’m more concerned about a working relationship and repeat business.
West Los Angeles Handyman
Posted: January 19, 2013 in UncategorizedTags: handyman in los angeles, handyman in west los angeles, handyman los angeles, los angeles handyman, west los angeles handyman
I’ve been a working as a West Los Angeles handyman for the past 19 years. I service areas like Marina Del Rey, Culver City, Mar Vista, Palms, West Los Angeles, Brentwood, Beverly Hills, Santa Monica, Pacific Palisades and a few other areas. As a West Los Angeles handyman, I understand the diverse needs of the people in my area that range from minor repairs to more involved renovations. I handle a wide array of repairs and new installations dealing with plumbing, electrical and carpentry. I mostly get called in for electrical and plumbing service calls, so that tends to be my strong suit, however I am fully tooled up for all sorts of carpentry jobs and other miscellaneous jobs.
One other thing I’d like to add, while this may not have any bearing on whether or not you hire me, I’ve been a believer in Christ for over 30 years. I’m not telling you this preach to you, convert you, make myself sound superior to anyone else or a number of other things. My only real reason for mentioning this, is that being a believer that God is always with me at all times holds me to a very high accountability level. How does this translate to you? Simply put, if I damage something in your home by accident or any number of other honesty related issues, I’m going to come forward to you about it and claim responsibility, where other handymen might not. It also means that you can trust me in your home when you’re not able to be there with me during the process of doing the repairs.
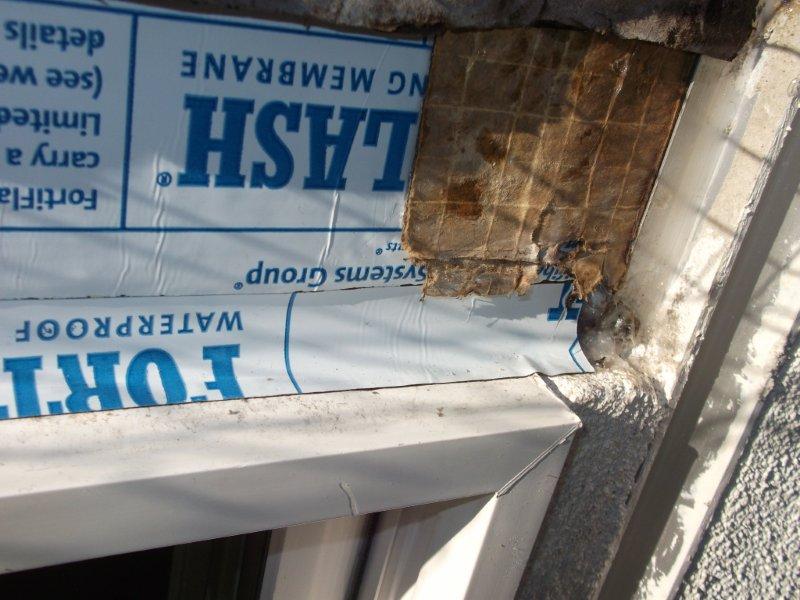
Stucco patching job
Posted: January 18, 2013 in UncategorizedTags: stucco patching, stucco patching job
Stucco patching job
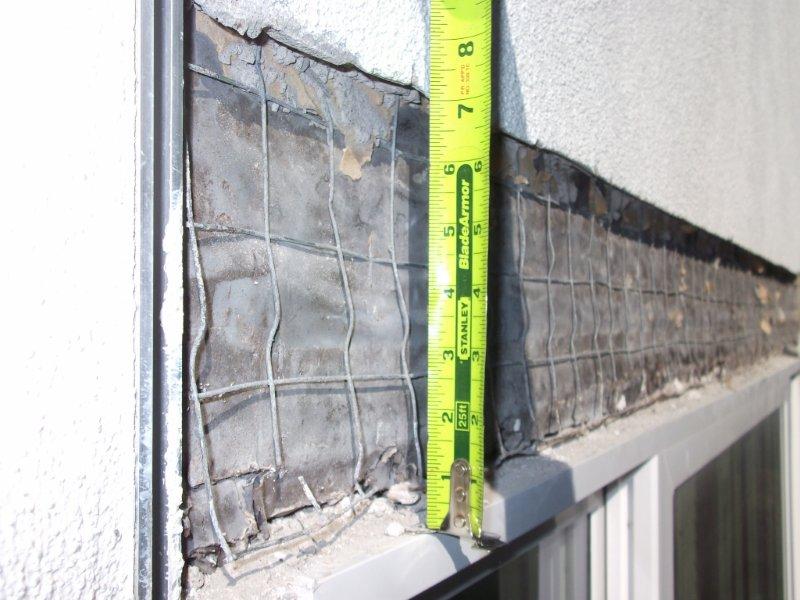
This first stucco patching job that I’m going to show you is regarding a new window installation that was improperly flashed by the installer, which wasn’t me, by the way. This first picture of the stucco patching job is when I was cutting away and removing the stucco from around the top of the window. You will notice in this picture that the original cut line was only 1 ½”. This is the amount of stucco that was removed and subsequently replaced by the window installer.

In the next picture of the stucco patching job, you will see the proper amount of stucco that needs to be removed in order to flash a window properly.
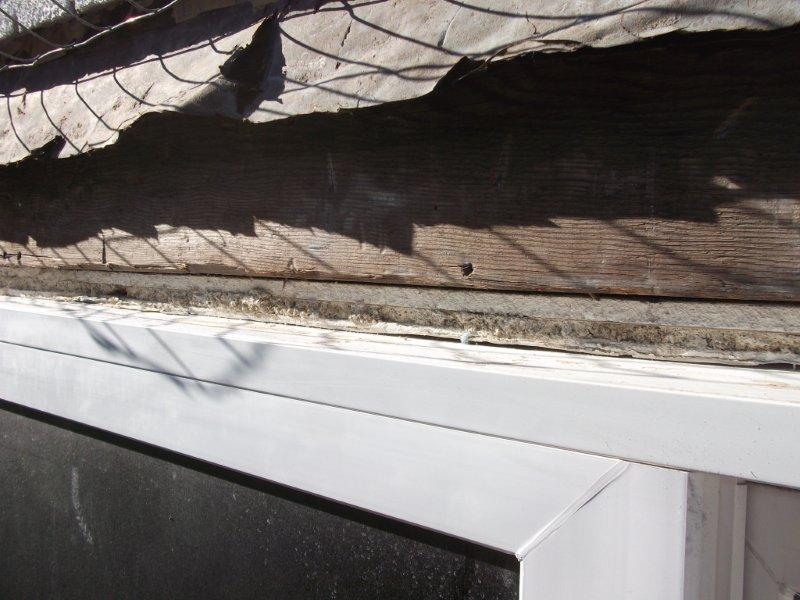
After I removed the 7” of stucco for the stucco patching job, I pulled back the original wire mesh, cut off all but about 2” of it and then left about 4” of the original tar paper to overlap the new flashing that I installed.
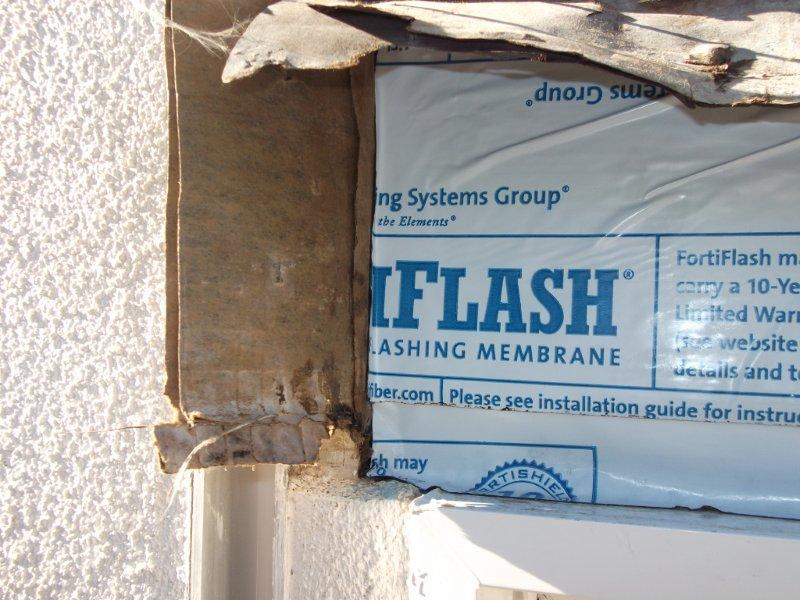
In this next picture of the stucco patching job I used a product called Fortiflash, which is a special type of window flashing that has a self adhesive backing that bonds to the window header. I purposely brought this down and lipped it onto the top of the window frame for watershed purposes and water tight integrity.

The next step of the stucco patching job is to make sure that the new flashing goes underneath the original flashing or tar paper and then to fold it over and onto the new flashing in proper sequence. In these next two pictures of the stucco patching job, you notice that the first one shows the flaps of the old flashing and then how it looks after they have been folded over and onto the new flashing. I used clear silicone to adhere the old to the new.
The next part of the stucco patching job is to install the wire lathe. I prefer to use the fine mesh stucco lathe, as it has more contact surface for the stucco to adhere to. You may or may not be able to see in this picture of the stucco patching job that I not only used screws to secure the mesh, as apposed to nails, but that I also used zip ties to unify the old mesh to the new mesh. The zip ties that I used are blue in color.

In this next picture of the stucco patching job, you will see the final appearance of how the stucco looks. It’s next to impossible to get the stucco patch to match the existing stucco for several reasons, which I won’t go into detail about here.

In this last picture of the stucco patching job, I have a close up picture showing how I ran a bead of white caulk along the top of the window to help watershed. I also did this along the sides and bottom of the window. This is very important with stucco patching because stucco is concrete based and will crack from earthquake vibrations and such.

